Monday, June 28, 2010

Good garden food!

I am trying to keep up with the produce we have been getting from the garden. A few days ago, I spent some time preparing and freezing corn and beans. A couple nights ago, I used some of the produce from the garden to make a really great pizza. Today my youngest and I spent some time making pickles and plum jam.

The jam I have done before, but the pickles are new to me. I never seemed to have enough cucumbers at one time to make anything with them. This year, I planted a couple more cucumber plants so I had just enough cukes to make some sliced pickles.

Cukes, onion, and garlic getting ready for jars.
Photobucket

Jars full and ready for pickling liquid.
Photobucket

My helper measuring out ingredients and cooking the pickling liquid.
Photobucket

Photobucket

Finished product, hopefully they will taste good!
Photobucket


The jam is made from plums that a friend gave us in exchange for some eggs. We do have a plum tree, but it is still too young to produce fruit for us to keep. We knocked off almost all the young fruit this year so that the tree wouldn't have to work so hard to make fruit. I was very glad to get some great plums from our friend.

Photobucket

Pitting plums is messy work. I wish I knew an easier way.
Photobucket

Cooking the jam.
Photobucket

My set up for making jam. I have the pot with the jam cooking, then a water bath canner heating up next to the jam pot. The counter next to the stove has a towel where I will put the jars as I am filling them and where they will rest and cool after being processed. On that towel, I also have a small pan that holds the lids in very hot water. I heat the jars in the oven and then put them in the microwave to stay warm after I take the jam off the stove. I have found the microwave to be the perfect place because the empty jars aren't getting in the way but are very easy to get to.
Photobucket

Filled jars ready for their water bath.
Photobucket

Finished jars of delicious plum jam!
Photobucket


My next project will be to make some cheese. I'm not sure what kind I will be making, but watch for pictures sometime within the next month!

Thursday, June 24, 2010

Butter me up!

I am lucky enough to get to milk a cow twice a week and therefore have fresh, raw milk at my fingertips. We tend to drink a lot of milk in our house. I think my love of milk came from drinking Milk Maid instead of fresh milk when I was growing up in Alaska. I know we had fresh milk sometimes, but I mostly remember the pitcher of Milk Maid we seemed to always have in the fridge. If you aren't familiar with Milk Maid, it was a powdered milk that you would mix with water to create a product that was supposed to taste like milk. I remember it being not horrible, but not great either. When we moved to the lower 48, we always had fresh milk and I think the vast difference made me a milk lover forever.

I use our raw milk in everything from pancakes to yogurt, but I really like making butter. It is a fair amount of work for not much final product, but it sure tastes great on roasted fingerling potatoes! If you have never made butter, it's worth doing at least once just for the experience. The process is simple. Here is a little picture tutorial for you:

Start with several quarts of non-homogenized, whole milk (if you don't have this kind of milk available, you can just buy some heavy or whipping cream from the grocery store, it will work just as well).

Photobucket


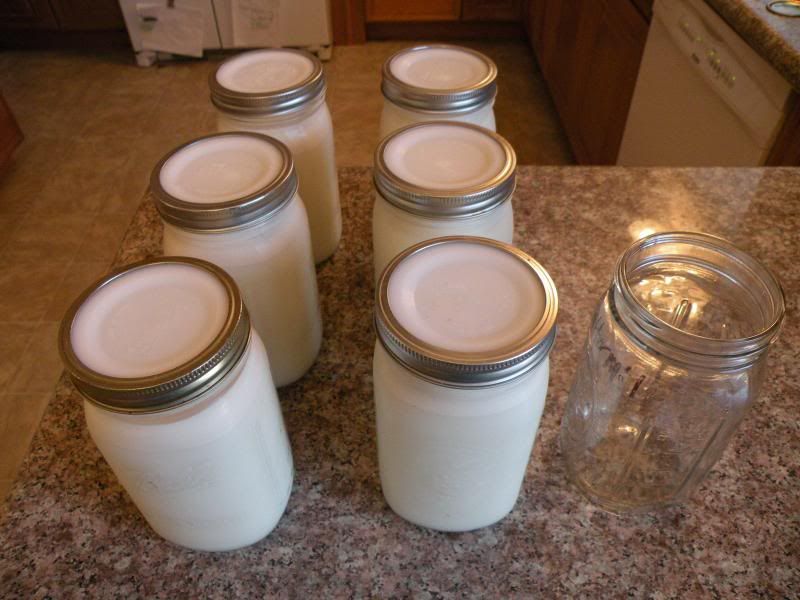
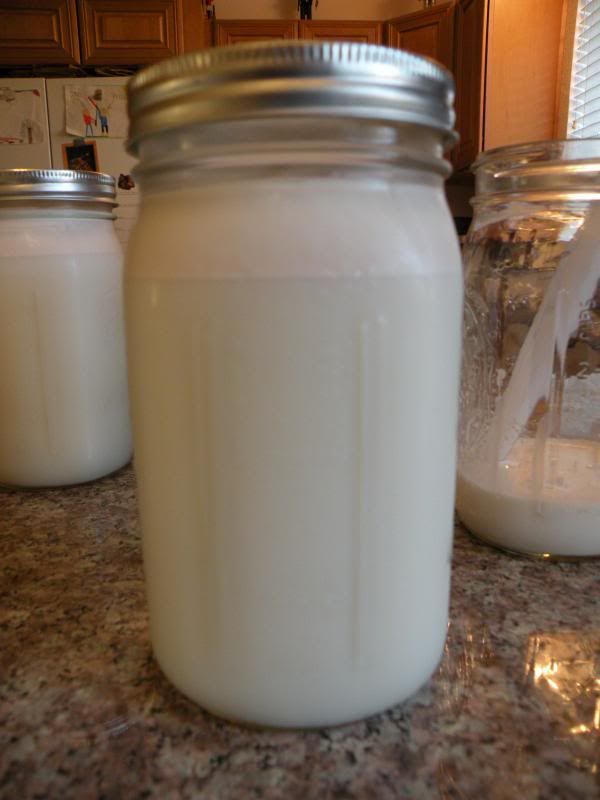
You can see the cream that has risen to the top of this jar.

Photobucket


Use a turkey baster to skim the cream off the top of the jars.

Photobucket


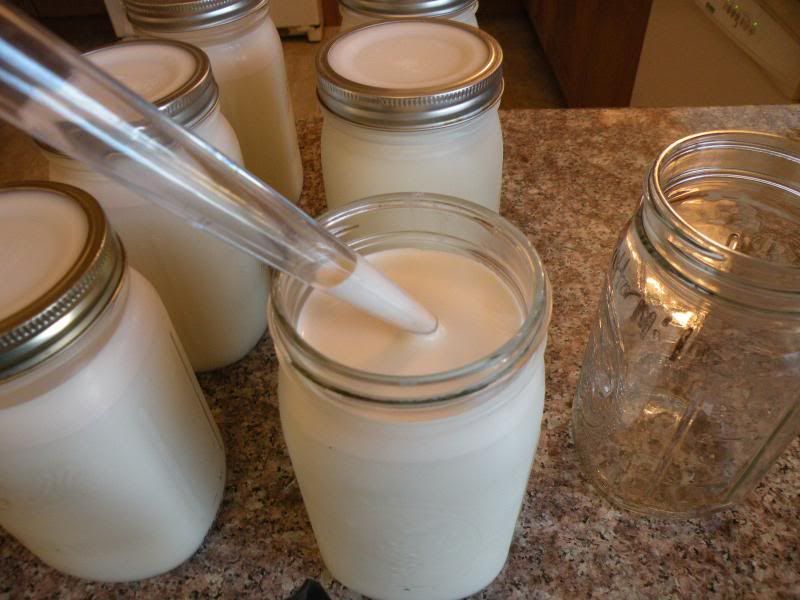
Put the skimmed cream into a clean jar and make sure you cap it tightly!

Photobucket


Sit down in front of the TV or something else to keep your mind off how long this next step takes. Shake the jar... a lot.

Photobucket


This step takes around 15-20mins. In my family, I do this alone, but if you can get someone to take turns with you, it will be much easier. The milk will seem to grow in volume due to air being mixed in. If you open the jar after shaking for a bit, you will see a lot of froth.

Photobucket


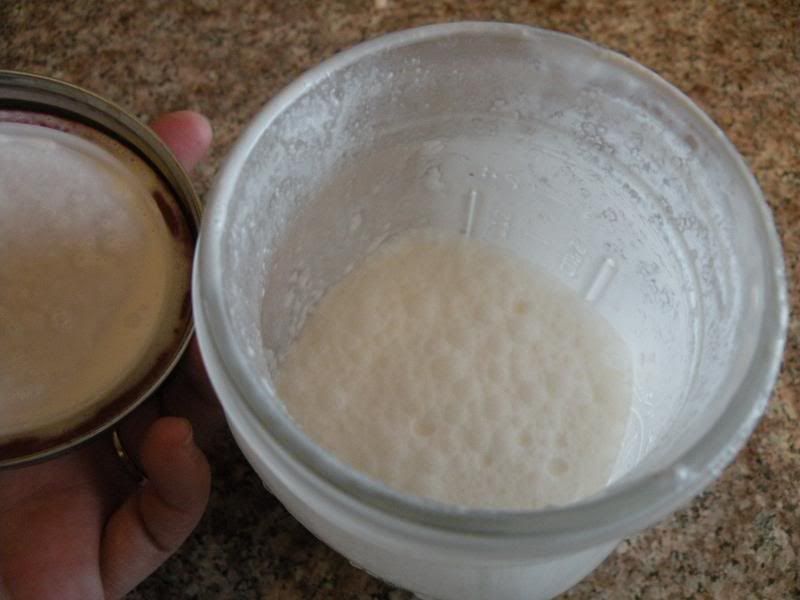
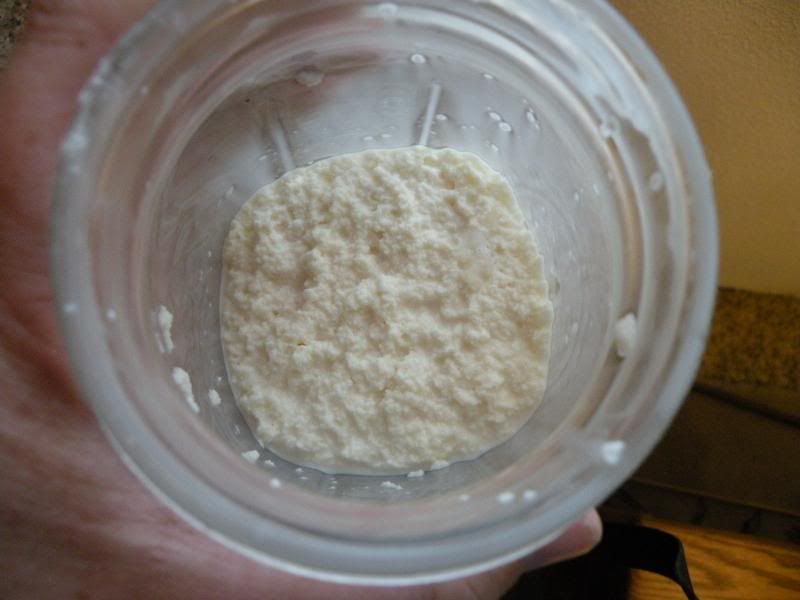
Once your arms feel like they are about to fall off, you will be almost done. Just keep it up! Look at the side of the jar. If it looks kind of lumpy, you probably have butter! Shake for another minute just to be sure. Open the jar to see if it looks like this:

Photobucket


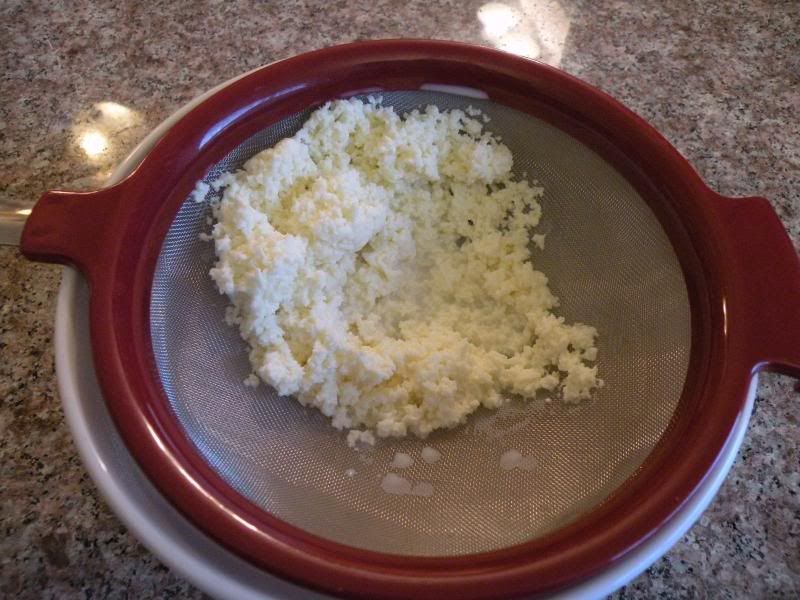
Dump your butter out into a strainer (make sure there is a bowl or something underneath!).

Photobucket


Use a spoon or, if you have it, a butter paddle to press the buttermilk out of the butter. This is an important step. If there is a lot of buttermilk left in the butter, it will taste a little off and spoil much more quickly.

Photobucket


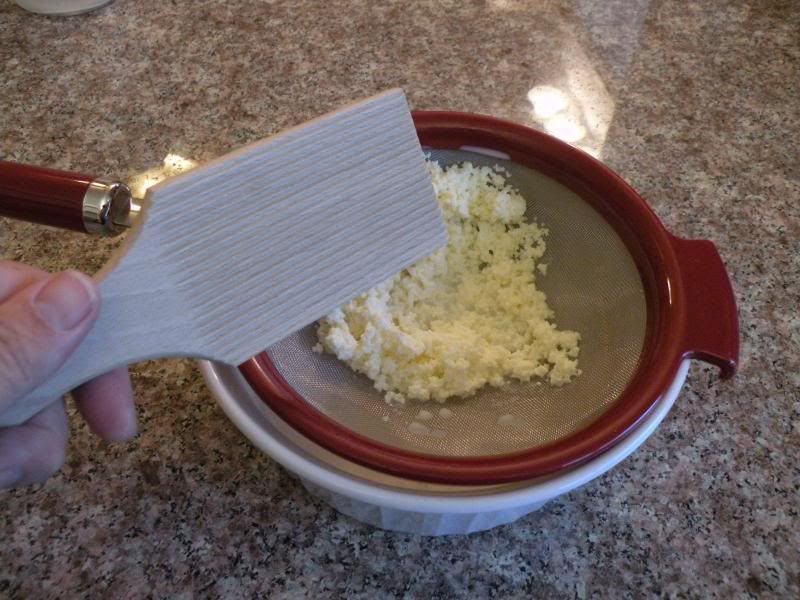
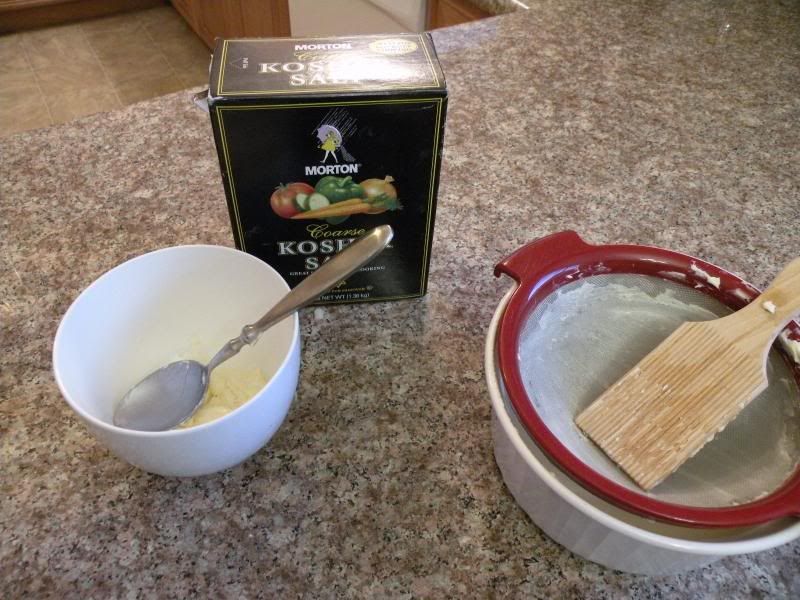
After you have pressed out the buttermilk (making sure to scrape the butter off the underside of the strainer that got squeezed through with the buttermilk), put your butter into a bowl and add salt if you desire. You can taste your butter to see how much salt you want it to have.

Photobucket


You can keep your butter in the fridge, but I keep mine in a butter bell. It keeps the butter fresh but at room temperature so that it is soft when I want to spread it on something.

Photobucket

Photobucket


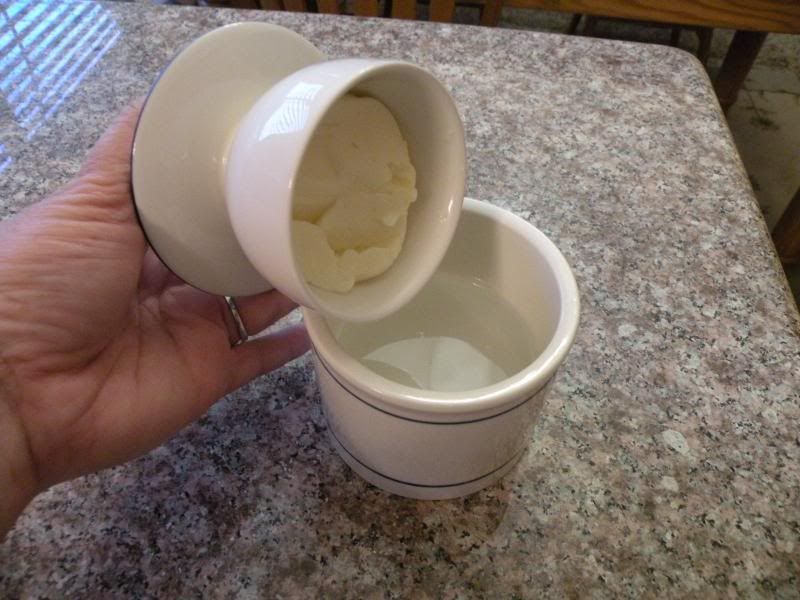
Butter bells are filled partway with water so that when you lower the lid which contains the butter, the butter is surrounded with cool water that keeps it from going rancid. Plus, I just think they look neat. As I said earlier in this post, my favorite way to use fresh butter is on roasted fingerling potatoes with a little salt and pepper. Nothing better!


*Don't throw away the leftover buttermilk. It isn't like the buttermilk you can buy at the store as it hasn't fermented at all. I use the leftover milk in things like pancakes and biscuits just like any other milk.

Wednesday, June 23, 2010

Various garden pictures.

Some random pictures I took out in the gardens yesterday.

Baby yellow pear tomatoes:
Photobucket

Teeny jalepenos:
Photobucket

Fireworks tomatoes that are interesting as they produce good sized fruit all in bunches rather like a cherry tomato does:
Photobucket

Ripening sugar pie pumpkin:
Photobucket

Some purple bush beans that I am letting to mature and dry on the vine so that I have seeds for next year's crop (they were labeled as bush beans, but they have climed all over the place):
Photobucket

Cucumbers that I'm not sure when to pick:
Photobucket

Sunflowers that my youngest desperately wanted to plant and have done fabulously so far:
Photobucket

Baby acorn squash (I think... it started out looking exactly like an acorn squash but has gotten suspiciously round):
Photobucket

A flower on the top of a carnival carrot stalk:
Photobucket

Corn worm, and other, woes.

Last year, we had corn on either side of our front walk and it did very well. We had about 12 plants and probably got around 18 ears of corn by the time we pulled them out. This year, I wanted to go bigger as we really love fresh corn on the cob. I planted a three sisters garden. Basically it is just planting corn, beans, and squash in the same area. We planted ours by making mounds and planting the corn in the middle of the mounds. The beans were planted about halfway down the mound on either side of the corn. The squash was planted on the flat ground in between the corn mounds. The idea is that the beans provide nutrients which the corn needs, the beans are able to use the corn to climb on, and the squash gets the water that flows down the mounds as well as providing ground cover to keep the weeds down. What a great idea right?

My little helper:
Photobucket

What the three sisters garden looked like when we first planted the corn:
Photobucket

A few weeks later (still looking pretty good!):
Photobucket

Today (taken from the opposite side of the garden):
Photobucket


While we are getting some good produce from this garden, a few things went wrong. The beans just got to be too much for the corn and has pulled over about half the stalks. The corn still was fertilized fairly well before the stalks were pulled over, but it does make for some difficulty in harvesting both the corn and the beans. I'm sure the squash (in this case, pumpkin and acorn squash), would have done fine as a weed preventative had I kept up with the weeding all along. Unfortunately, we were away on vacation for a couple weeks and the weeds took full advantage. When we came back, there was so much grass in there that was so thick, that I just couldn't keep up with it. I am trying to pull some of it each day and now that the squash vines cover more, the grass doesn't come back right away, but it's hard to maneuver in there without stepping on squash vines.

All said, I would plant a garden like this again, but I would make a few changes. I would start my squash plants inside so that they didn't have to start all the way from seed when I put the corn in. I would also stake the corn somewhat to prevent the beans from pulling them over.

The biggest problem we had with the corn was corn worms. Grrrrr. I had been keeping an eye out for them but they seemed to pop up and eat my crop within a day. I found one about a week ago and started looking through all the ears only to find that they had decimated about half my corn crop. I went through and pulled all the ears that were ready, gave the worm-eaten parts to the chickens and kept the rest. We got about a dozen half-ears once we broke off the wormy parts. At least the corn we did get is very tasty!

Photobucket

Wednesday, June 16, 2010

It's the bees knees!

I inspected a hive today. It is from a swarm that I captured a couple months ago and is doing very well. Almost all of the bottom box is full of comb, brood, and honey. The second, and currently top, box has a good start on comb. Here are some pictures from the inspection:

Photobucket

Photobucket

Photobucket

Photobucket

Photobucket


Some facts about bees you may not know:

All worker bees are female. Despite what you may have seen in The Bee Movie, the male bees (called drones) are actually pretty lazy freeloaders for the most part. Their job is to mate with the queen and that's it. When a swarm gets ready to leave a hive to look for a new place to live, the first thing the ladies do is start kicking out the drones so that they aren't wasting honey on bees who don't do any work.

The smoke that is used on hives during hive inspections is just to fool the bees into thinking there is a fire. The bees gorge themselves on honey in preparation for leaving the hive to look for a new place to live (the honey goes into a special honey stomach). The honey makes them docile and therefore easier to deal with during the inspection. Once the inspection is over and the hive is still intact, the bees disgorge the honey back into the honey cells and life goes on like normal.

Bees keep their hive sanitary with something called propolis which they gather from trees. They use the propolis to glue things together in the hive. In the case of a Langstroth hive that is the most common hive used, they glue the top down, the frames together, pretty much everywhere they see any kind of opening, they glue it shut with propolis. They also use the propolis to cover anything that invades the hive but is too big for them to take outside. If a mouse or something like that gets in the hive, they sting it to death and then cover its body with propolis to keep it from rotting and letting bad bacteria into the hive. Propolis is thought to have many medicinal benefits for people as well.


More bee facts to come!

Sunday, June 13, 2010

Funky Chickens

Just thought I would post some of my favorite chicken pictures I have taken over the years as well as answer some of the most common chicken questions I get.

Here is Luna, an Easter Egger pullet we got as a week old chick in 2008. Pullet generally refers to a young female chicken. Some people refer to any girl chicken under a year of age as a pullet. I tend to call them pullets until they lay at around six to eight months old, then I call them hens.
Photobucket


We only have hens on our property since roosters aren't allowed in our area. Roosters are nice to have around as they look after the hens, protecting them as well as showing them the best places to lay and the choicest bits of food to scratch up. It is not necessary to have a rooster to get eggs, hens will lay eggs even if there is no rooster around.


There is a pecking order in every flock. This California Gray hen, Ginny, was the flock leader at our place for quite a while:
Photobucket


As you can see from the picture above, hens can have large combs (the red part on the top of the head), and wattles (the red parts under the beak), just as roosters do. Some people think only roosters have large, red combs and wattles, but the size and shape of the comb depends on the breed. Ginny, above, has a single comb and it is flopping over a bit at the top as is common for her breed. There are other types of combs, but a single comb is by far the most common. Luna, the Easter Egger in the first picture has a pea comb. Sprout, a Light Brahma, also has a pea comb (she is the white bird with the striking black feathers around her neck in this picture).
Photobucket


Chickens can fly a little bit, just not much. They can fly enough to get out of their run if there isn't anything to stop them. If left without a coop or roost to retire to in the evenings, chickens will roost in trees.


Chickens are social creatures. They like having other chickens around them. However, they will sometimes pick on a chicken they decide they don't like. We had two little Rhode Island Red chicks named Fred and George who just didn't fit in with the bigger girls when we got them. We ended up having two separate coops to house them in since they couldn't get along in the same one. Sadly, Fred was killed by (we suspect), a feral cat one night and George was quite lonely without her. In order to keep her from getting pecked by the big girls but still provide her with some company, we got two little Australorp chicks (Katie and Angelina) who adopted her as their mother. They would follow her around and copy her. She didn't mind their company and she and Katie are now the lead hens in our flock.
Photobucket

Photobucket


Chickens are ominvores and pretty much eat anything that crosses their path, including small rodents, frogs, each other *yuck! I try to give them lots of different treats to keep them healthy and busy. Yogurt is always a flock favorite.
Photobucket

Photobucket


Chickens and other animals can coexist fairly peacefully as long as your other animals don't see your chickens as prey.
Photobucket

Photobucket

Everyone enjoys a bowl of raisin bran. Had I been quicker with the camera, you would be seeing a couple dogs with their heads in the bowl as well.
Photobucket